ai

Your AI Design Assistant: 4 Real-World Examples for Everyday Design Work

Your AI Design Assistant: 4 Real-World Examples for Everyday Design Work Cieden

Most designers either don’t use AI at all or they try it once and come away unimpressed. This article will show you how to turn an AI design assistant into a real partner in your workflow. You’ll learn:

  • which AI tools are genuinely useful for design (and why ChatGPT isn’t the top choice);

  • how to write prompts that actually deliver great results;

  • a step-by-step workflow for everything from UX copy to interactive prototypes;

  • how to use an AI design assistant for brainstorming ideas and even getting real-time feedback.

No coding knowledge required (just the curiosity to try something new!).

Why AI still feels untapped in design

For the past two years, AI has been the hottest topic in tech. But in the design community, there’s still this common belief: “There aren’t any good AI tools for us.”

Talking to my colleagues only reinforced that impression. Most avoid AI simply because they don’t know how to use it properly or because of one disappointing experience that put them off.

As a product designer at Cieden, I’ve gone deep into this space over the past year, experimenting with different tools in real projects. Through that hands-on process, I found the ones that truly make the design workflow faster and better.

Best AI design assistant tools for designers

AI design assistant tools

There’s no shortage of AI apps out there. Seriously, you can find a tool for almost anything. But in practice, only a few consistently deliver value for designers. Here are the standouts:

  • Claude → best for text generation, design ideation, and wireframing;

  • v0 & Cursor → great for complex prototyping and experimenting with side projects;

  • Perplexity → perfect for web research and sharpening your prompts;

  • Gemini 2.0 → surprisingly good as a live assistant for both design and development tasks.

Now, you might be wondering: what about ChatGPT?

Yes, it’s the most popular, but in real design work, I’ve found Claude consistently produces better results. Even with ChatGPT’s newer features like Canvas, web browsing, or Sora for video generation, I’ve rarely found them useful in practice.

Claude also recently rolled out Projects (more on that in a minute) and MCPs that are basically integrations. The only one that’s clicked for me is Brave search, which lets you pull web results straight into Claude. The downside, though, is that setting it up feels more technical than most designers would like. 

That’s why alternatives like Perplexity are still way more convenient.

For me, AI in design boils down to three main categories:

  • text: UX writing, research, documentation;

  • UI: wireframes, mockups, prototypes;

  • live assistance: brainstorming, feedback, tutoring.

These three buckets have become part of my daily workflow. Let’s unpack them one by one.

Input-to-text

This is probably where AI feels most natural for designers, helping with all the writing and research tasks that eat up way too much time. 

Here’s how I use it day to day:

  • polishing communication: Cleaning up grammar and tone in emails or presentations, so nothing gets lost with international teams;

  • quick answers: Getting instant solutions to design-related questions (e.g., “How do I embed Calendly into a Framer landing page?”);

  • idea validation: Checking whether a design is realistic for devs before sinking hours into it;

  • summarization: Turning long docs or user interview transcripts into clear takeaways;

  • UX copywriting: Replacing Lorem Ipsum with context-aware copy that makes designs feel real;

  • knowledge bases: Building a Claude Project with all product docs, so it doubles as a 24/7 FAQ for the team;

  • documentation drafts: Generating PRDs, test scripts, StoryBrands, CJMs, and even business model outlines;

  • research: Running quick competitor or trend analysis using web-enabled models;

  • content structure: Spinning up the skeleton of a landing page or feature flow based on a client brief.

For me, this category alone is worth using AI. It cuts through so much of the invisible work that normally slows down design. And once you stop treating AI as just a text generator and start using it as a collaborator, it’s like having a research assistant and junior PM all rolled into one.

Input-to-UI

This is where things get exciting. 

Instead of spending hours drawing boxes in Figma, you can describe what you want in plain English and let AI handle the heavy lifting. 

Here are some ways I use it:

  • user research tools: Generating interactive tests like tree testing and hooking them up to a spreadsheet to track results automatically;

  • wireframing with words: Writing natural language prompts instead of drawing boxes. It feels odd at first, but it saves a ton of time;

  • high-fidelity UI: Producing surprisingly polished mockups. Styling is still a bit limited, but it’s evolving fast;

  • complex prototypes: Building multi-step flows or even full mini-projects by just chatting with the AI. You don’t need deep coding knowledge, just a basic sense of how components should interact.

Live assistance

This is still a newer area for designers, but when it works, it honestly feels like magic. 

Instead of treating AI as something you “check in with” after the fact, you can have it side-by-side while you work.

Here are two of my favorite use cases:

  • brainstorming: Sharing your Figma screen with Gemini and bouncing ideas back and forth. It’s like having a teammate in the room, except this one can instantly suggest alternative layouts or flag technical constraints;

  • language coaching: Using ChatGPT as a personal English tutor. Super handy if you’re working with global teams and want to get more confident in communication.

An approach that always works

After using AI daily for design, I keep coming back to one simple loop that delivers solid results no matter which tool you’re using. Think of it as the “AI best practices” checklist:

  • work in English: It’s simple. Most AI models are trained on English content. You’ll get richer, more accurate answers in English than in any other language.

  • write the most detailed prompt you can: Bad outputs usually come from vague inputs. Even though AI is improving at filling in the gaps, the more context you give, the better the results.

  • let the AI interview you: Send your prompt to Claude or Perplexity and ask it to come back with clarifying questions. It forces you to think about details you might have missed, while giving the model the exact context it needs.

  • answer thoroughly: Don’t rush this part. About 7-10 questions are usually enough to cover the edges without wasting time.

  • run the improved version: Feed the refined prompt back in. The output will be clearer and much more useful.

This loop turns your AI design assistant from a guessing machine into a collaborator. Instead of throwing half-baked prompts at it and hoping for the best, you’re building context together, and that’s where the real value shows up in design work.

Practical example #1: Prompt engineering with Perplexity

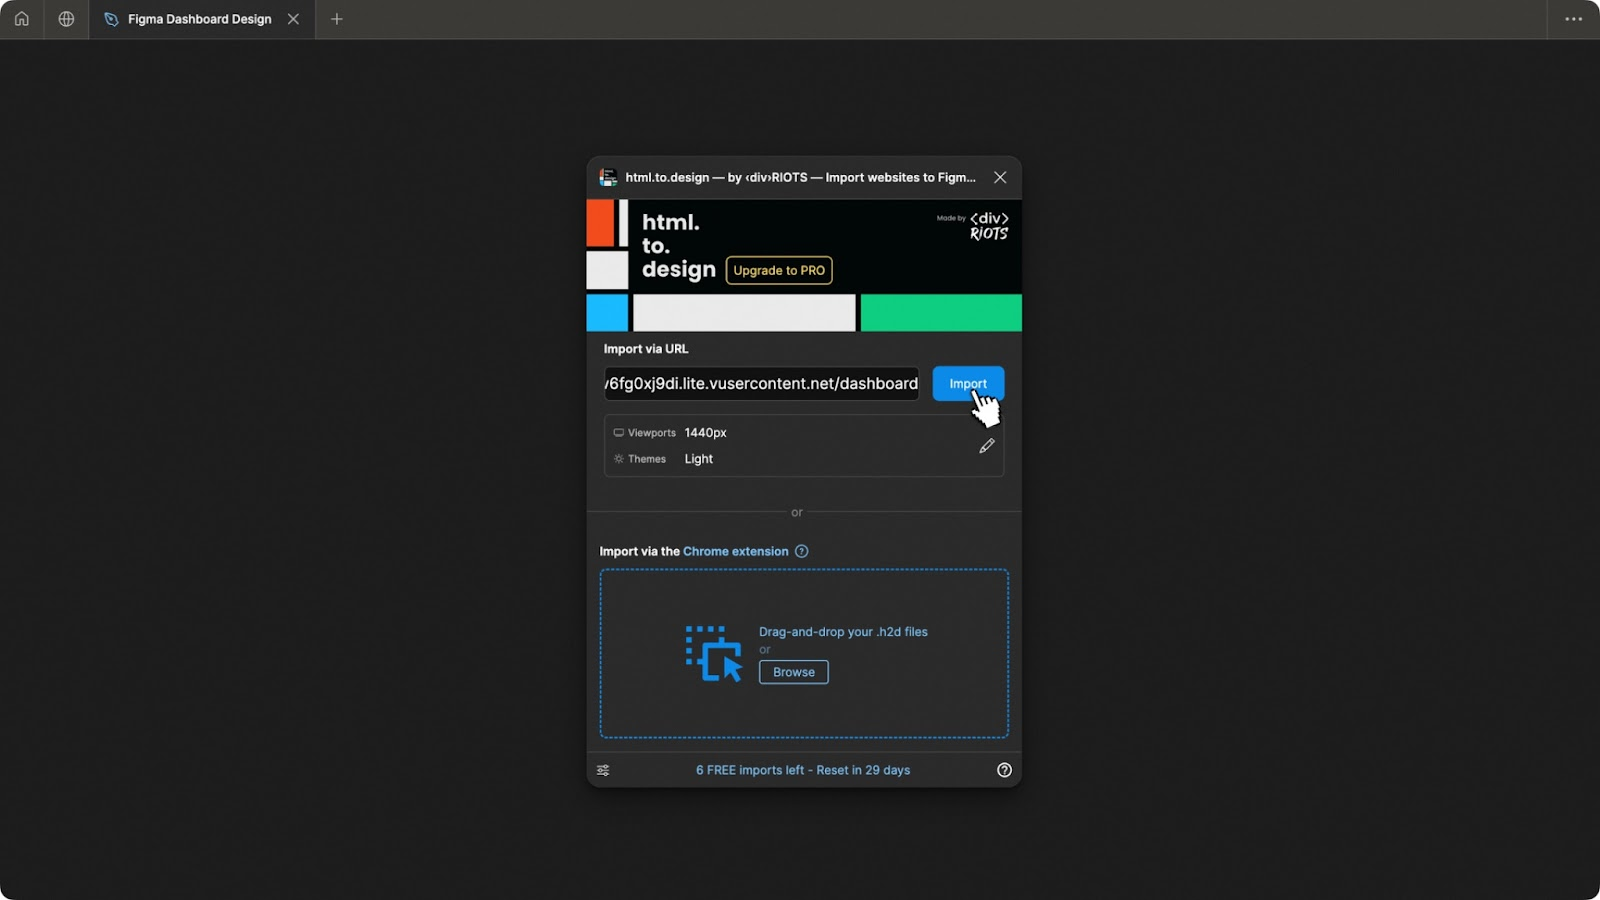
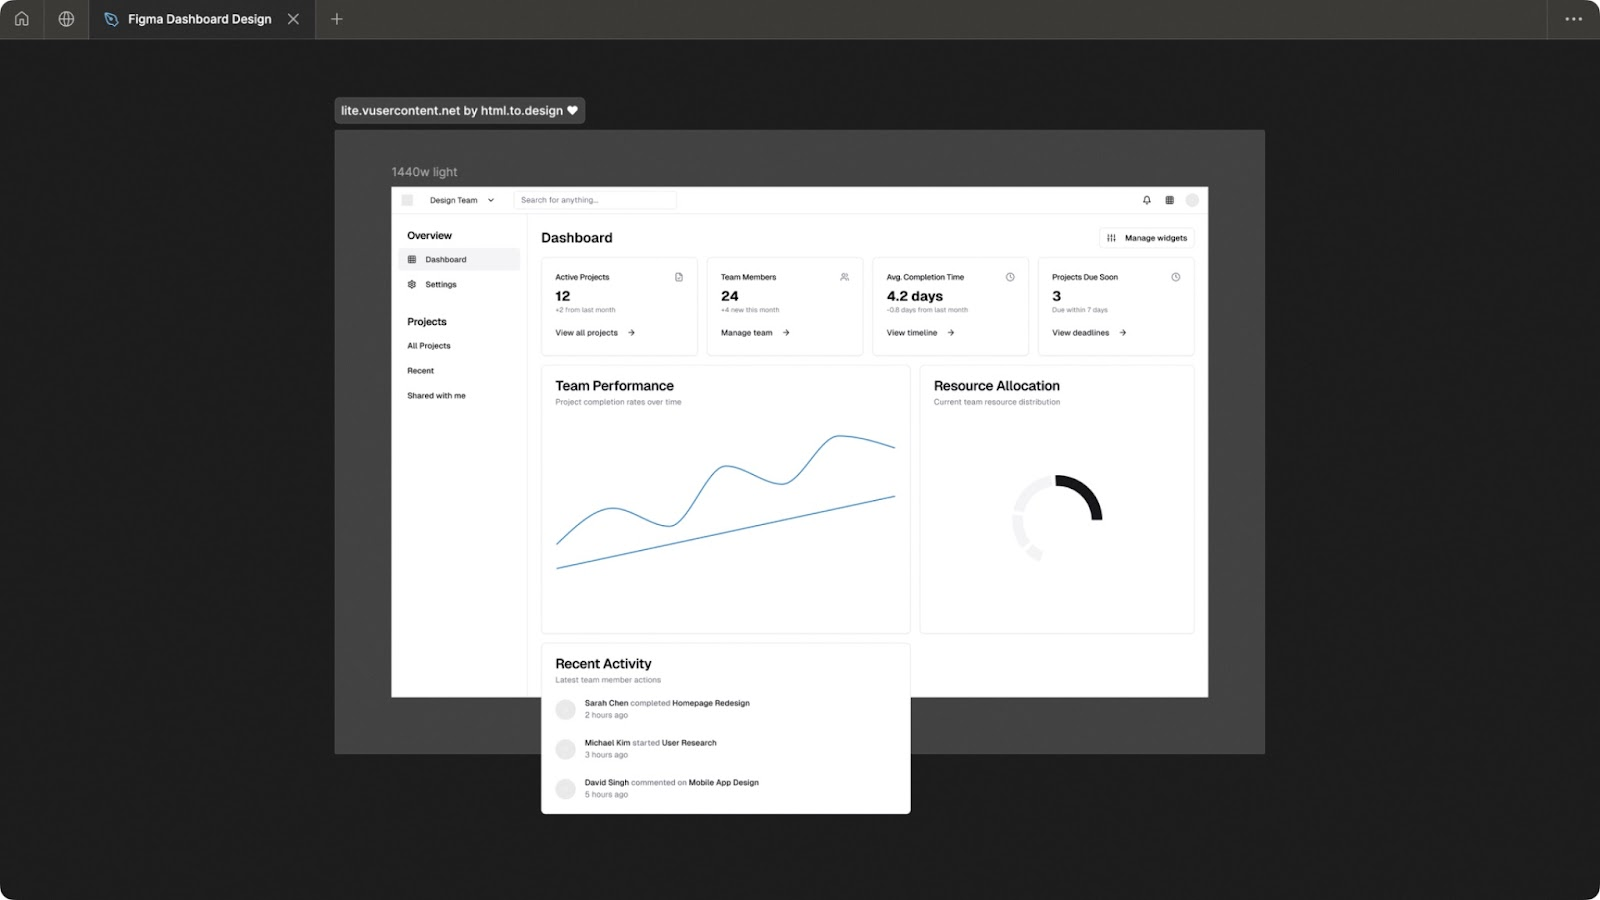
One of the easiest ways to sabotage AI is a weak prompt. If you just type something like “Create a dashboard design” into Claude, you’ll get a generic result that still needs tons of iterations. It wastes time and barely scratches the surface of what AI can do.

That’s why I started using a simple but powerful method I call prompt engineering. It works in any AI chat tool, but I’ve had the best results with Claude and Perplexity (especially when the prompt includes links or needs live web data).

Here’s the framework I use:

Copyable Prompt — Bulletproof Line Breaks
Prompt

You are an expert in prompt engineering and optimization. Your task is to analyze and improve the following prompt: "Put your original prompt here"

Please follow these steps:

  1. Briefly explain your understanding of the prompt’s goal.
  2. Identify any ambiguities, unclear instructions, or potential issues.
  3. Ask ten crucial clarifying questions to better understand my intent.
  4. Wait for my responses before proceeding.
  5. Suggest an improved version of the prompt based on the clarifications.
  6. Let me give feedback and refine it if needed.
  7. Once the final version is ready, answer the prompt using the large language model.
Copied!

This structure forces the AI to slow down and really understand what you want before generating.

Let’s look at a quick example. Suppose you’re designing a dashboard page for Figma’s web app. You want to think through widgets, consider different user personas, and make the page as informative as possible.

Here’s how I run it in Perplexity:

1. Open Perplexity and turn on Pro Search (3 free tries per day).

Perplexity AI design assistant

2. Write a detailed prompt using the framework above. Add references if needed (links, docs, etc.).

Perplexity AI design assistant

3. Answer the AI’s clarifying questions and repeat a few rounds if necessary.

Perplexity AI design assistant

4. Finally, ask the AI to rewrite the improved prompt for you.

Perplexity AI design assistant

The difference is night and day.

Prompt Comparison — Before & After
Original Prompt
Improved Prompt

I need to design a Dashboard page for Figma’s web application. This task requires ideating widgets that would be shown there, as well as considering various user personas to make the page as informative for everyone as possible.

Here’s the link to their website: www.figma.com, also, you can review their forum to understand the users and their pains: forum.figma.com

I need to design a Dashboard page for Figma’s web application. The goal is to create a user-friendly interface that caters to various user personas, including:

  1. Regular Solo Designers: They need quick access to design tools, project templates, and resources, focusing on efficiency and intuitive navigation.
  2. Team Designers: They require collaboration tools, version control, and visibility into team projects and tasks.
  3. Design Managers: They seek an overview of team performance, project timelines, and resource allocation, with analytics to assess productivity.
  4. Clients: They want access to project updates and deliverables, ensuring transparency in the design process.
  5. Developers: They need integration with design handoff tools and clear project timelines.

Key Tasks:

  • Widget Ideation: Brainstorm specific widgets that fulfill the needs of these personas, such as: Project Overview Widget (current projects and deadlines), Collaboration Tools Widget (real-time feedback), Analytics Widget (project timelines and performance metrics)
  • Style Consistency: Ensure the dashboard aligns with Figma’s existing UI style (UI3), maintaining similar color schemes, typography, and iconography.
  • User Experience Enhancements: Consider features like drag-and-drop customization for widgets and filtering options based on user roles.
  • Feedback Mechanisms: Incorporate options for users to provide feedback directly through the dashboard for continuous improvement.

Reference for Inspiration:
Review how Glide structures its dashboards for insights into user-friendly layouts that prioritize data visualization and interactivity.

Objective:
The dashboard should enable users to quickly understand the state of their work while providing a cohesive experience that enhances productivity and collaboration across different roles within the Figma ecosystem.

Pretty great, right? And that’s just from reframing the way you ask the question.

Practical example #2: Wireframing with Claude Projects

Now that you have a solid, well-engineered prompt, you can take things a step further: use it to generate design ideas and wireframes.

If you haven’t tried Claude’s Projects yet, think of them as folders that hold multiple chats, all sharing the same context. You can upload docs, set instructions, and the AI will keep that knowledge across conversations. It’s like giving Claude a memory just for one project.

Here’s the workflow I use:

1. Create a Project in Claude: This requires the Pro plan, but in my opinion, it’s worth it. If you’re not ready to pay, v0 has a similar feature with a free tier, though with some trade-offs we’ll cover later.

Claude AI design assistant

2. Upload your product docs: Anything you have: style guides, requirements, design principles. Claude only reads text, so screenshots in PDFs will be ignored, but you can attach images directly to messages inside the chat when needed.

3. Add project instructions: Spell out what Claude’s role should be (e.g., “a senior product designer with some React knowledge”), what standards to follow (e.g., “always reference project docs and stick to Figma UI3 guidelines”), and what process to use (e.g., “start with prompt-engineering questions”).

Claude AI design assistant

Here’s a good example of an instruction that makes Claude a little smarter.

⚠️ Heads up


Claude sometimes “forgets” rules, even if you’re explicit. Just remind it during the chat if it drifts.

4. Start a new chat inside the project: Paste in your improved prompt (from the Perplexity step earlier) and add any relevant task description or screenshots of your current design or visual references.

What happens next is pretty cool. Claude will usually begin with a structured “thinking protocol,” ask clarifying questions, then generate wireframes or UI ideas based on your answers and the uploaded docs.

Claude AI design assistant

The results won’t be pixel-perfect. In fact, your first try might be rough. But compared to hand-drawing wireframes in Figma, this method gets you to a usable starting point way faster. 

Claude AI design assistant

And if you ask it to render UI and it only gives text, just remind it to use the Artifacts feature.

One feature I love is that Claude lets you publish and share generated designs. So instead of exporting everything yourself, you can send a link to your team, get feedback, and only then bring the design into Figma as the “final stage.”

Claude AI design assistant

Still, Figma should always be your final destination. AI can accelerate exploration, but it’s not yet good enough to produce final production-ready UIs.

💡Quick alternative: v0


If you’d rather test the concept before paying for Claude Pro, v0 also has “Projects.” Just know that it uses shadcn/ui as its default component library, so the output often looks more like “their style” than “your style.” You can hack around it by designing in Claude first, then moving the generated code into v0.


Another limitation is that v0 caps project instructions at 5,000 characters. But it shines in other areas, which we’ll see in the next example.

Practical example #3: Complex prototyping with v0 and Cursor

v0 stands out when you want to go beyond snippets and build actual working AI prototypes. Instead of just giving you static mockups, it generates full mini-projects with proper structure that you can immediately export into a code editor like VS Code or Cursor and continue from there.

Here’s how I usually approach it:

1. Set up a Project in v0: Use the same method as with Claude: upload docs, set clear instructions, and define the context. The free version lets you create up to 5 projects, which is plenty for experimentation.

v0 AI design assistant

2. Write a detailed prompt: Or reuse the improved dashboard prompt from earlier. The more specific you are, the better.

v0 AI design assistant

3. Iterate in chat: This is where v0 is much better compared to Claude. You can highlight a specific part of the generated UI and leave comments like “Add a Manage Widgets button with a sidebar to toggle them on/off.” It’s interactive, almost like giving notes to a junior designer.

v0 AI design assistant

4. Preview and share: v0 lets you open the design in full-screen mode or share a link with teammates for feedback. You can even run lightweight user tests on these interactive prototypes.

v0 AI design assistant

Both Claude and v0 work best for desktop web apps, but you can generate mobile UIs too. Just switch your browser into responsive mode (Safari or Chrome DevTools) to preview how the layout adapts. Otherwise, you’ll just see a stretched desktop version.

v0 AI design assistant

💡Pro tip


If you like what you see in v0 and want to bring it into Figma, use the plugin html.to.design. Just paste the v0 link, and it’ll import the UI as editable Figma components.


But v0 has one serious problem: it starts to lag when designs get too complex. If you’re trying to prototype an entire product with lots of flows and custom styling, you’ll quickly hit its limits. 

The cool part, though, is that you don’t need to be a developer anymore to take this code further. Thanks to modern AI code editors, you can literally talk to your code in natural language. Even if you’ve never touched front-end before, you can spin up a working prototype.

There’s a common stereotype that these tools can only create “shitty-looking,” buggy products unless you’re already a developer. I believed that too, until I spent a few days testing Cursor. 

I used it to build new product functionality with fairly complex logic across multiple user flows. And honestly? The stereotype is wrong. You really can create good-looking products without writing code manually.

Of course, to be 100% transparent, having some basic dev knowledge does help. It makes it easier and faster to guide the AI toward a production-ready code. That’s why I plan to cover this in a follow-up article on how to build with Cursor AI step by step (stay tuned!)

The Cursor workflow looks like this:

1. Generate a design in v0 and copy the npx shadcn add command from Add to Codebase.

Cursor AI design assistant

2. Create a new folder and open it in Cursor.

3. Run that command in the terminal to set up your project.

Cursor AI design assistant

4. Start the dev server with npm run dev and preview it in your browser.

Cursor AI design assistant

5. Use Cursor’s AI chat sidebar to add features or fix issues.

Cursor AI design assistant

6. Push to GitHub and deploy via Vercel for a stable link you can share.

Cursor AI design assistant

Yes, it’s a bit more involved than staying in Figma, but the payoff is huge. You get clickable prototypes that behave like real products, and you can validate flows with users much earlier.

💡Note


If you’re curious to explore beyond Claude and v0, two other UI generators worth testing are:


  • bolt.new → clean designs, code export as ZIP, built-in mobile preview (though buggy in Safari);

  • lovable.dev → similar to Bolt, slightly weaker output, but integrates with Builder.io for Figma-to-code export that’s impressively close to the original.

Practical example #4: Live assistance with Gemini 2.0

One of the most exciting recent updates in the AI space has been the launch of Gemini 2.0 (and now, Gemini 2.5). Honestly, I’ve never been a huge fan of Google’s earlier LLMs, as they always felt a step behind. But this version changed my mind.

The standout feature for me is the new multimodal live API. In plain English, that means you can talk to Gemini in real time with your voice, camera, and even by sharing your screen. And yes, that includes sharing your Figma workspace while you’re designing.

Imagine this: you’re tweaking a layout in Figma, and at the same time, Gemini is watching your screen, giving you feedback, suggesting alternative approaches, or flagging potential dev issues. 

And it’s not limited to design. For example, if you’re just getting started with front-end development and using Cursor, you could share your screen and literally talk through your code with Gemini: “Why isn’t this component rendering?” or “Can you show me a simpler way to write this function?”

For now, it’s free to try while it’s still in testing. You don’t need to install anything fancy either; you can access it directly through Google AI Studio.

Gemini AI design assistant

The future of the AI design assistant

It’s only a matter of time before AI reaches a level where it can replace some designers. But to be clear, I’m talking about designers who don’t adopt these tools. If you want to stay relevant and keep creating great products, the key is to move with the wave, not against it.

Personally, I’m optimistic. I hope that 2026 is the year we, as designers, spend less time nudging pixels around in Figma and more time solving actual human problems. 

So if you haven’t already, now’s the time to start experimenting. Use your AI design assistant to brainstorm, to prototype, to validate ideas faster. The sooner you build it into your workflow, the better positioned you’ll be when the tools inevitably get even more powerful.

Happy designing!

we reply under 24 hours.

Book your
free
session
Thank you for your message. It has been sent